Shifting Sands 09
Round 5
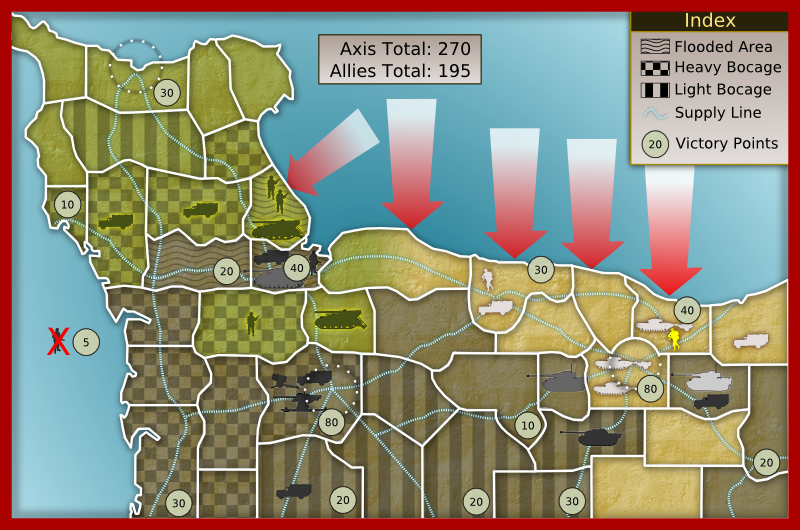
This would lead to a very exciting final round. The Americans would have to strike at St Lo while being out of supply and try to retake Carentan. The British would try to hold onto Caen. The British executed perfect strategy by attacking away from Caen drawing in Firestorm units that were meant to attack Caen (much to the German commander's disgust!). However, the US players had totally ignored their orders and all of the commanders but one had assaulted Carentan! This left just one American commander and one initiative roll to see if the could even strike St Lo. Luckily, the American won the roll and St Lo would come under attack!
In a nail-biting round, the Allies were able to make-up for all past mistakes and took St Lo, Carentan and held Caen! They also managed to destroy another Fallschirmjäger Firestorm unit. A final, convincing win for the Allies.
Overall, the event was a blast. It was a welcome change to see a team mentality in a tournament, especially when the decisions and battles of players near the bottom in points can swing the campaign entirely. The final assault on St Lo was by a player in the lower half of the standings by VPs, but it was ultimately his Initiative roll and victory that won the game for the Allies! Below is just some random notes regarding the event and some of the decisions we made, especially read the Strategy piece.
We used some Special Event cards that I randomly drew each round (3 per round). These would either help each of the forces in their battles and really added some spice to the event.
Special Event Cards
Weather Change: Heavy rain, no air support including AOPs and visibility down to 24"/60cm. You should hve heard the Allies gasp when this was revealed on round one.
Weather Change: Light rain, air support arrives on 6 only, visibility 36"/90cm.
Choked Supply: Any Allies out of supply subtract one from dice roll on supply chart (added round 2).
Rampaging Typhoons: Any Axis out of supply subtract one from dice roll on supply chart (added round 2).
Rommel at the Point: Company Command team may attach to a platoon to give reroll to failed ST moves.
Gather Round Monty: Any support platoons on table allowed British Company Command team to reroll company command checks.
Sacked by Bradley: If US Company Command team fails company morale check the 2IC Command team may be promoted to CO and reroll it.
(above 3 are from Firestorm Total War part)
Rocket armed Thunderbolts: Any Thunderbolts can fire rockets as per Typhoons.
5.5" Artillery Strike: Allies get a single 5.5" template strike in game. Need Ob with staff team or CO to call in.
Nebelwerfer Strike: Axis get one free double width nebel strike in game. Need Ob with staff team, or rockets, or CO to call in.
Rommel hurt in air attack: Command disruption. Axis Company Command teams cannot give a reroll to Motivation checks.
Officer Sniping: British officers lost at alarming rate. British armies cannot use brit bulldog rule in game.
Mistaken Identity: US friendly fire casualties cause cautious movement. No US unit may use Spearhead or double move in game.
ME109 Strafe: Axis players get one ME109 strafe in game.
Expanded NGFS: NGFS (Naval Gun Fire Support) may be used up to an additional territory instead of just the beach territory.
Firestorm Units
I really liked using "rare" units as Firestorm units. I also liked that these units were forbidden from regular lists. I did make a huge mistake by allowing 3 Crocodile units and 3 US Parachute Infantry units. That was fine when we had 9 US players and 9 Brits, but after attrition and only 6 brits, 7 US, it was too many. I just didn't think about it but I should have pulled one each of those. The German units were perfect and played out very historically for the most part with the heavy armour staying in the British sector and the Fallschirmjäger always fighting over Carentan. In future I would add Luftwaffe Field Divisions too. The Allied mix was too bland and I should have mixed it up. I liked the M12s as nobody takes them anyway and they are just too cool looking to leave behind! Allied air support and NGFS was overwhelming mostly because the Allies were pushed back to the beaches several times meaning NGFS was always available and any recycled Firestorm units were brought directly into play. Unlike the regular Firestorm, we reversed the strategic phase and bring on reinforcements so that they would have to spend one turn in their supply depot before being moved to the front. This was a good call.
Overall, the Firestorm units were an important part of the game and could really sway a battle in a crucial sector. They also worked wonders in a strategic sense too as sometimes a player couldn't resist taking a firestorm unit even though it didn't help their strategic cause and this would drive the generals nuts!
Overall, the Firestorm units were an important part of the game and could really sway a battle in a crucial sector. They also worked wonders in a strategic sense too as sometimes a player couldn't resist taking a firestorm unit even though it didn't help their strategic cause and this would drive the generals nuts!
Strategy
I was concerned that the sheer number of simultaneous games would make strategy impossible, but that wasn't the case. It did help that our final numbers were 26 instead of the 38 that were initially signed up. There were many aspects of strategy that were identified or missed and I hope that the respective generals will reflect upon their own decisions. The hardest part was the general relaying his strategy to his commanders. I only allowed the generals to be at the board in the strategic phase and they then had to leave and brief their commanders away from the board as I did the next round match-ups. This created a little Fog of War which was very fun to observe. It was fantastic to see a player come to the table and make a move that was completely against his generals wishes. A control freak's nightmare! Factors affecting strategy:
1. Don't attack out of the cities!! Several people made this mistake even against expressed orders not to!
2. Don't get wide-eyed over Firestorm units. If it's not in the team's best interest to take them...don't take them. Bill pulled off a very strategic move by attacking a Firestorm unit controlled territory next to Caen. Instead of leaving the Firestorm unit for someone else to use to attack Caen (2 King Tigers), the German couldn't resist taking them!! This meant no advantage to the German attacking Caen as that meant they would have no Firestorm units to Caen's 2 Crocodile units.
3. In unfavourable match-ups, attack in bad terrain or unnecessary territories. Bill's Cromwells fought on open terrain all tournament, not once did an opponent choose to fight near Villers-Bocage or outside St Lo where he would have been forced to play on the VB table or in Bocage. I had purposefully set the room up to represent the Normandy map so all the British territories were on one side of the room with their themed tables and it flowed to the US side. This meant that you could look at where you were fighting on the map and know where you would be playing in the room.
Terrain
7 Bocage tables for fighting around St Lo and Villers-Bocage etc.
Flooded fields table.
Carentan.
St Lo
Cruelly (was used as a standard town table for both sectors too)
Dickie's Bridge
Carpiquet (Caen table 1)
Caen (Caen table 2)
Colombelles Steelworks (Caen table 3)
Villers-Bocage
Hill 112
Orne Bridge
Cagny/Le Mesnil Frementel
Written by: Mark Francis (Bullyboy)
Maps and Website support by: Chris Dunlap (Bengo)